Creating Executables
One of the overwhelming env3d feature request is to include the ability to create OS specific executables. While env3d has had the ability to create applets for some time, the use of Java applets have been in decline in the last decade as applets have been plagued with poor browser support and security issues. I believe that it is now time to move on and I have completed the first implementation of deploying semi-native executables (I'll explain the "semi" part later).
To use this new feature, download the latest version of env3d (http://sourceforge.net/projects/env3d/files/env3d_template.zip/download) and open it in BlueJ. After writing your env3d application, make sure you include a "main" method in your Game class, as follows:
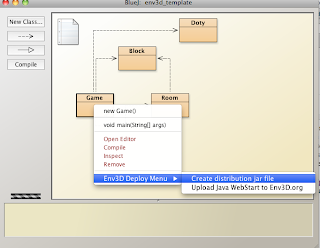
All you have to do now is to right click on the Game class in BlueJ and a new option would appear in the Env3D menu:
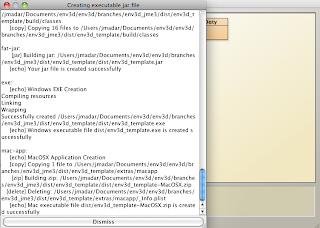
When you click on the "Create distribution jar file" item, a new window will appear showing you the entire packaging process. From the screenshot below, you can see that first, a "jar" file is created, then the Windows EXE file is created, followed by the MacOS executable. You can click on the "Dismiss" button once the MacOS executable is finished.
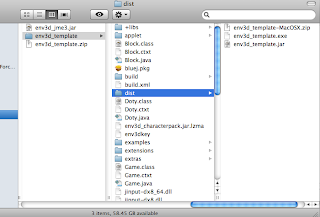
To find your executable files, go into the project folder. You'll see a "dist" folder is now created. Inside the "dist" folder are 3 files: env3d_template.jar, env3d_template.exe, and env3d_template-macOSX.zip
That's pretty much it, you now have 3 types of executables to use. The zip file contains the executable for the Mac, the .exe file is for windows, and the jar file is for any OS including Linux.
As far as the Mac executable is concerned, OSX will automatically prompt the user to download Java if it is not already installed.
Have fun using this new feature and let me know if you find any bugs. Stay tuned because the Android deployment option is coming real soon! :)
To use this new feature, download the latest version of env3d (http://sourceforge.net/projects/env3d/files/env3d_template.zip/download) and open it in BlueJ. After writing your env3d application, make sure you include a "main" method in your Game class, as follows:
 |
| If you are using the scene creator feature, the main method is already included by default. |
All you have to do now is to right click on the Game class in BlueJ and a new option would appear in the Env3D menu:
When you click on the "Create distribution jar file" item, a new window will appear showing you the entire packaging process. From the screenshot below, you can see that first, a "jar" file is created, then the Windows EXE file is created, followed by the MacOS executable. You can click on the "Dismiss" button once the MacOS executable is finished.
To find your executable files, go into the project folder. You'll see a "dist" folder is now created. Inside the "dist" folder are 3 files: env3d_template.jar, env3d_template.exe, and env3d_template-macOSX.zip
That's pretty much it, you now have 3 types of executables to use. The zip file contains the executable for the Mac, the .exe file is for windows, and the jar file is for any OS including Linux.
Technology
The technology that makes creating windows exe possible is called lanuch4j (http://launch4j.sourceforge.net/). It is basically an exe wrapper that looks for the locally installed JVM and use it to launch your program. Therefore, your user will still need to have at least the Java JRE installed in order for the exe to work. If the JRE is not found on the user's system, it will prompt the user to download one.As far as the Mac executable is concerned, OSX will automatically prompt the user to download Java if it is not already installed.
Have fun using this new feature and let me know if you find any bugs. Stay tuned because the Android deployment option is coming real soon! :)


